TexMaths Modes
Starting with version 0.51, TexMaths has two equation modes, depending on the position of the cursor in a Writer, Impress or Draw document. When the cursor is located inside a text box (in Impress this is where you type your text, in Draw you can enter a text box by double clicking on a form, and in Writer this is when a text box in inserted on the page), TexMaths automatically switches to Text Mode. Anywhere else, TexMaths uses the LaTeX mode.
In LaTeX mode, you get as usual your equation as a graphic image in PNG or SVG format. In Text mode, the equation is inserted as a set of characters using TexMaths fonts (these fonts are specific to TexMaths and are automatically installed when needed). This is because, due to a limitation in LibreOffice, it is not possible to insert graphics within a text box and so TexMaths has to insert equations as text.
The Text mode has some features and limitations that are explained lower.
The TexMaths Toolbar
 Once the TexMaths extension is installed into LibreOffice, you should see a new toolbar in Writer, Impress and Draw. This is the TexMaths toolbar. In Writer, this toolbar is made of four icons, while in Impress and Draw there are only three.
In Writer, clicking on the left most icon (the one with the blue Pi symbol) launches the TexMaths Equations macro. The second icon is used for TexMaths Numbered Equations. The third icon is bound to the TexMaths Recompile Equations macro. Finally, clicking on the right most icon opens the TexMaths System Configuration dialog. Note that in Impress and Draw, the second icon is not present. There is also a Tools/TexMaths submenu, located just above the Tools/Macros submenu.
Getting started with TexMaths Equations
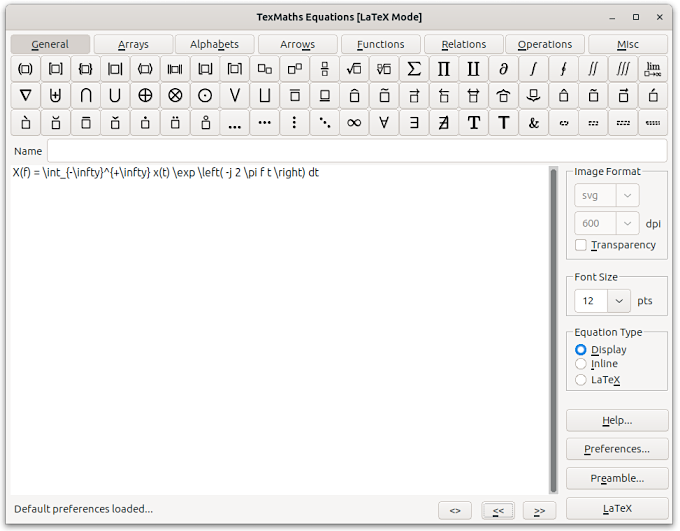 If LaTeX is already installed on your system, all you have to do to start with TexMaths is to click on the TexMaths Equations icon from the TexMaths toolbar. TexMaths will try to find the external programs it uses to generate LaTeX equations. Then, type some LaTeX code in the text field of the TexMaths Equations editor and click on the LaTeX button to generate the equation image.
Ex: x(t) = \mu ^2 (t) should produce the equation

Starting with TexMaths 0.46, the equation editor features symbol palettes to enter LaTeX code for more than 300 symbols. Just click on the selected symbol and the corresponding LaTeX code will be inserted at the cursor position in the equation editor. Symbol icons can be hidden in the Interface tab of the TexMaths System Configuration dialog. Symbols color (black or white) can also be defined there.
If the document cursor is positioned inside a text box, TexMaths automatically switches to Text mode and installs TexMaths fonts for the local user. In this case, Equations are not inserted as PNG or SVG graphic images but as normal characters using TexMaths fonts.
Generate LaTeX equations
Once you typed an equation, you can generate it by clicking on the LaTeX button of the TexMaths Equations dialog. In LaTeX mode, this generates an image of your equation in the format, type and size you selected. You can choose between LaTeX, XeLaTeX and LuaLaTeX compilers in the System Configuration dialog. In Text mode, this inserts a set of characters using TexMaths fonts that represents the equation. The font size is equal to the text font size.
[LaTeX Mode] Selecting the Image Format
TexMaths can generate and insert two kinds of images in a LibreOffice document (when the cursor is not inside a text box). To select the image format, use the selector located within the Image Format frame.
The default image format is the SVG vector format. It allows LaTeX equations to be resized without precision loss and does not need any special math font to be installed in LibreOffice, because math symbols are simply drawn using curves. This is the preferred (and default) format but there can be some issues when exporting LibreOffice documents to MS Office (see below).
The other supported image format is PNG and is a raster image format. Thus, you have to select a resolution to use it. While 600 dpi is the default resolution, you can choose among several predefined values. There should be no compatibility issues when using PNG format for MS Office document export.
Note that each format is only available if the corresponding external program (dvisvgm for SVG and dvipng for PNG) is installed in your system with its path set using the TexMaths System Configuration dialog (usually guessed at first run). At least one of these two programs is required to run TexMaths.
[LaTeX Mode] Font Size
TexMaths can handle different character sizes for your equations. To change the font size, use the selector located within the font size frame.
You can choose between predefined font sizes or type the one you prefer if it is not listed.
[LaTeX Mode] Transparency
You can toggle the equation image transparency by checking the Transparency checkbox in the TexMaths Equations dialog box. This can be useful when the document background is not white. Transparency can be used with both SVG and PNG image formats.
[LaTeX Mode] Equation Type
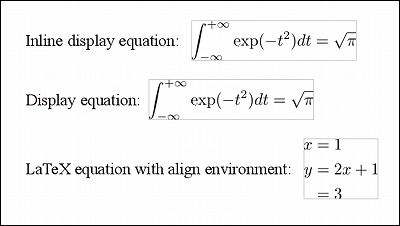
In LaTeX mode, TexMaths can generate three types of LaTeX equations:
- display equations
- inline display equations
- LaTeX equations
To select an equation type, just use the radio button located within the Equation Type frame.
To generate display equations or inline display equations, all you have to do is to select the appropriate equation type and then type the equation code in the text field of the TexMaths Equations dialog.
Ex: To generate the Greek alpha symbol, just type \alpha
Inline display equations are obtained the same way, but the difference is the style of the generated equation which is better integrated within a text in Writer. For example, sum index and exponent are displayed besides the sum sign and not below or above.
Both kinds of equations are ideal for simple one line equations and vertical alignment within text is correct, but they cannot handle multiline equations or more general LaTeX environments. For that kind of equations, select the LaTeX equation type and type your equation within \begin{} and \end{} instructions. You can use any LaTeX environment instructions.
Ex: Type the following lines to display a three lines equation, aligned on the equal sign.
\begin{align*}
x &= 1 \\
y &= 2x+1\\
&= 3\\
\end{align*}
[LaTeX Mode] Equation Name
In the TexMaths Equations dialog, you can enter a label in the Name text field. This can be used to retrieve an equation by its name and could help when dealing with animations in Impress.
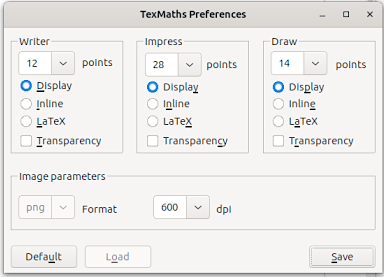
[LaTeX Mode] Preferences
TexMaths comes with some default settings. If these settings don't suit your needs, you can change them using the TexMaths Preferences dialog which is obtained by clicking on the Preferences button. This dialog allows to change the image format, font size, equation type, etc., for each type of LibreOffice document. You can then save your new settings, restore default ones or load already saved settings.
[LaTeX Mode] LaTeX Preamble
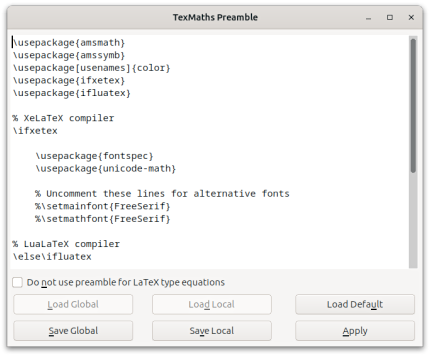
Clicking on the Preamble button shows the TexMaths Preamble dialog that allows to adjust your LaTeX preamble. For example, to generate colored equations, uncomment the following three lines of the default preamble, change the RGB color value as you prefer, and save the preamble.
% \definecolor{fgcolor}{RGB}{0,0,255}
% \definecolor{bgcolor}{RGB}{255,255,255}
% \pagecolor{bgcolor}\color{fgcolor}
Now, all new equations will have the color scheme you have defined in the preamble. Note that equations with a background color are not transparent anymore, even if the transparency option was checked. Therefore, you must remove the colored background if you want transparency.
The preamble is stored into the document properties. This way each document can have its own preamble. Note the default preamble is global and can't be changed. Note that LaTeX, XeLaTeX and LuaLaTeX have a different default preamble.
[LaTeX Mode] \input, \include and \usepackage Commands
Starting with TexMaths 0.41, \input and \include LaTeX commands can be used to insert the content of a LaTeX (.tex) text file. The inserted .tex files are assumed to be located in the same directory as the document.
Ex: In the document my_doc.odt, the LaTeX command:
\include{my_equations}
can be used to insert the content of the LaTeX file my_equations.tex provided that this file is located in the same directory as my_doc.odt.
There is also the possibility to use custom .sty files through the use of \usepackage commands. These commands have to be inserted in the preamble and then (if desired) stored in the current document. The .sty files have to be located in the same directory as the document.
Ex: In the document my_doc.odt, the document style my_style.sty can be used by adding to the LaTeX preamble the command:
\usepackage{my_style}
The file my_style.sty has to be located in the same directory as my_doc.odt otherwise this won't work.
[LaTeX Mode] Text to LaTex in Writer
Type some LaTeX code directly within a Writer document (i.e. without opening the TexMaths dialog), select the text and click on the TexMaths Equations icon (or use a keyboard shortcut if you have defined one). The selected text is then silently converted to a LaTeX equation image. The applied image format, equation size and equation type are the default ones defined in the TexMaths Preferences.
Note this won't work in Writer when the cursor is located inside a text box.
[LaTeX Mode] Edit Equations
Within a LibreOffice document, select an equation image (already generated using TexMaths) and click on the TexMaths Equations icon in the TexMaths toolbar (or use a keyboard shortcut if you have defined one). This shows up the TexMaths Equations dialog with the text of your equation selected. Just edit this text and click on the LaTeX button to generate the modified equation.
You can of course close a document, open it again and edit your saved equations.
[LaTeX Mode] Recompilation of TexMaths Equations
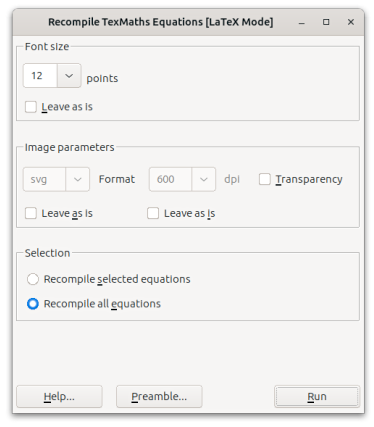
When a document (in Writer, Impress or Draw) contains many equations, it can be useful to change their font size, transparency, image format, etc., in a single shot. This is the purpose of the TexMaths Recompile Equations macro.
Clicking on the related toolbar icon (the one with the gear) opens a dialog where you can change a number of equation parameters and the preamble. If you don't want to change a parameter from a list, then enable the Leave as is button.
In any of the three document types, you can recompile all equations from the document by selecting the Recompile All Equations option.
In Writer documents, by selecting the Recompile Selected Equations option, you can choose to recompile only equations that are located within the selected text area. Note that, due to some limitations with selections in LibreOffice, this macro does not recompile equations located in tables, text frames, header and footer. If needed, you can recompile those equations one by one, by editing them the usual way.
In Impress and Draw documents, by selecting the Recompile Equations from Slide option, you can recompile only equations that are located within the current slide.
When all parameters and options have been set, then click on the Run button and all or selected equations should be updated with the new parameter values. When dealing with hundreds of equations, this can take a while, so please be patient.
[LaTeX Mode] Numbering Equations in Writer
Numbering equations is as simple as clicking on the TexMaths Numbered Equations icon (or entering a keyboard shortcut if you have defined one), entering your equation and clicking on the LaTeX button. A centered, numbered equation (with left or right numbering) is then automatically inserted in your Writer document.
You can also select the spacing you want and the equation caption in the Options Tab of the TexMaths System Configuration dialog.
Numbered equations cannot be inserted in Writer when the cursor is inside a text box.
[LaTeX Mode] Compatibility with ooolatex
Starting with version 0.34, TexMaths is compatible with ooolatex. This means that if you have a document that contains ooolatex equations, you can edit those equations by selecting them (one by one) and calling the TexMaths Equation macro. You can then modify the LaTeX code and regenerate the equation either in either SVG or PNG format, as you prefer.
[Text Mode] Equations
Text mode is automatically selected by TexMaths when the cursor is inside a text box. In Impress, this is the only way to enter an inline equation that moves with the text when it is modified. In Text mode, TexMaths tries to convert the LaTeX code in a set of characters using TexMaths fonts.
In Text mode, it is only possible to generate simple equations with at most one level of subscript and superscript. Anything else is not supported. Note that in Impress, it is still possible to generate complex equations in LaTeX mode by putting the cursor outside text boxes and clicking on the TexMaths Equation icon.
[Text Mode] Environments
In Text mode, curly braces are used to get environments with different positions and properties, like in the following equation:
y_n = \sum_{n=1}^{N-1} x_n
All symbols that are not greyed out in the symbol palette can be entered.
It is also possible to use some simple environments to format your equation:
- \text{}, \textrm{}, \textbf{}, \textit{} for text formatting
- \bold{}, \italic{}, \underline{} for font weight
- \mathbb{}, \mathcal{}, \mathscr{}, \mathfrak{} for special math fonts
- \huge{}, \Huge{}, \large{}, \Large{}, \small{}, \tiny{} for font size
You can also nest environments, like in the following example:
w \textrm{\large{text}} x
[Text Mode] Sharing documents having Text equations
If you want to share a document that contains TexMaths Text equations, there is no need to send the TexMaths fonts to your recipient. Instead, you can embed the TexMaths fonts in your document by using the menu File / Properties / Fonts / Font Embedding and enabling the Embed fonts in the document option. This works the same for Writer / Impress and Draw documents.
History
Starting with version 0.51, a history mechanism allows to retrieve previous equation codes within the equation editor. The two buttons << and >> permit to navigate through the history and the <> button is used to clear it.
System Configuration
Clicking on the third icon opens the TexMaths System Configuration dialog. Within the first tab of this dialog, you can change the file paths of the external programs. Since TexMaths 0.46, the complete file path has to be provided.
The second tab allows to select the LaTeX compiler (LaTeX, XeLaTeX or LuaLaTeX, if the latter ones are installed and supported by the dvisvgm version you use. Note that XeLaTeX cannot be used to produce PNG equation images). Options for equation numbering and compatibility with MS Word are also provided.
In the third tab, it is possible to select the font used in the equation editor and to set various options related to symbol icons.
The fourth tab of the System Configuration dialog allows to define some keyboard shortcuts to launch TexMaths macros.
Exporting documents to MS Office
If you plan to export your documents to MS Office (Word and Powerpoint, whatever versions), you can save your LibreOffice documents to .docx and .pptx formats.
It is also recommended to set the Word vertical alignment compatibility option (in the TexMaths System Configuration dialog) if your Writer documents have to be exported to Word. This will fix erratic vertical alignment of inline equations in Word.
Keyboard Shortcuts
To configure shortcuts for launching the TexMaths Equations with or without numbering, click on the TexMaths System Configuration button of the TexMaths toolbar and define your shortcuts. For equations without numbering, you can have a single shortcut for all applications or a different one for each. Since numbered equations can only be used in Writer, there is only one shortcut for them.
Within the TexMaths Equations dialog, you can use the following shortcuts:
- Esc to close the dialog without generating and equation
- Alt-L or Ctrl-L to generate an equation
- Alt-P or Ctrl-P to display the Preferences dialog
- Alt-B or Ctrl-B to display the Preamble dialog
Known Issues
- While developed for LibreOffice, TexMaths can also be used in Apache Openoffice 4.x.
- Equations that include PSTricks commands cannot be rendered correctly as PNG images because of dvipng. You can safely use the SVG format instead.
- When exporting Impress documents with text equations to MS PowerPoint format, even if the embedding font option is enabled in Impress, there is a bug that makes the embedded fonts not available in PowerPoint. Fortunately, here is a workaround: in Windows, having the TexMaths fonts installed, open the .pptx with PowerPoint and embed fonts there (use File / Options / Save, then Embed Fonts in File and select the desired embedding option). Now your .pptx document has embedded fonts and can be shared with other people.
- On Linux, TexMaths doesn't work with snap or flatpak but works with appimage packages.